Nt· (/an’ti dõt’/) Device Documentation
Note
- Official website: https://ntdot.health
- GTS website: https://gts.health
- Novel-T: https://novel-t.ch
- Contact: info@novel-t.ch
Welcome to the Nt· (/an’ti dõt’/) device documentation. This guide is intended for anyone involved in campaign logistics and support using the Nt· device for field tracking activities (e.g., vaccination campaigns). The documentation is split into the following sections:
1. Introduction & Overview
This section covers fundamental information about the Nt· device, including hardware layout, how to charge it, and essential steps to get started quickly.
Device Overview
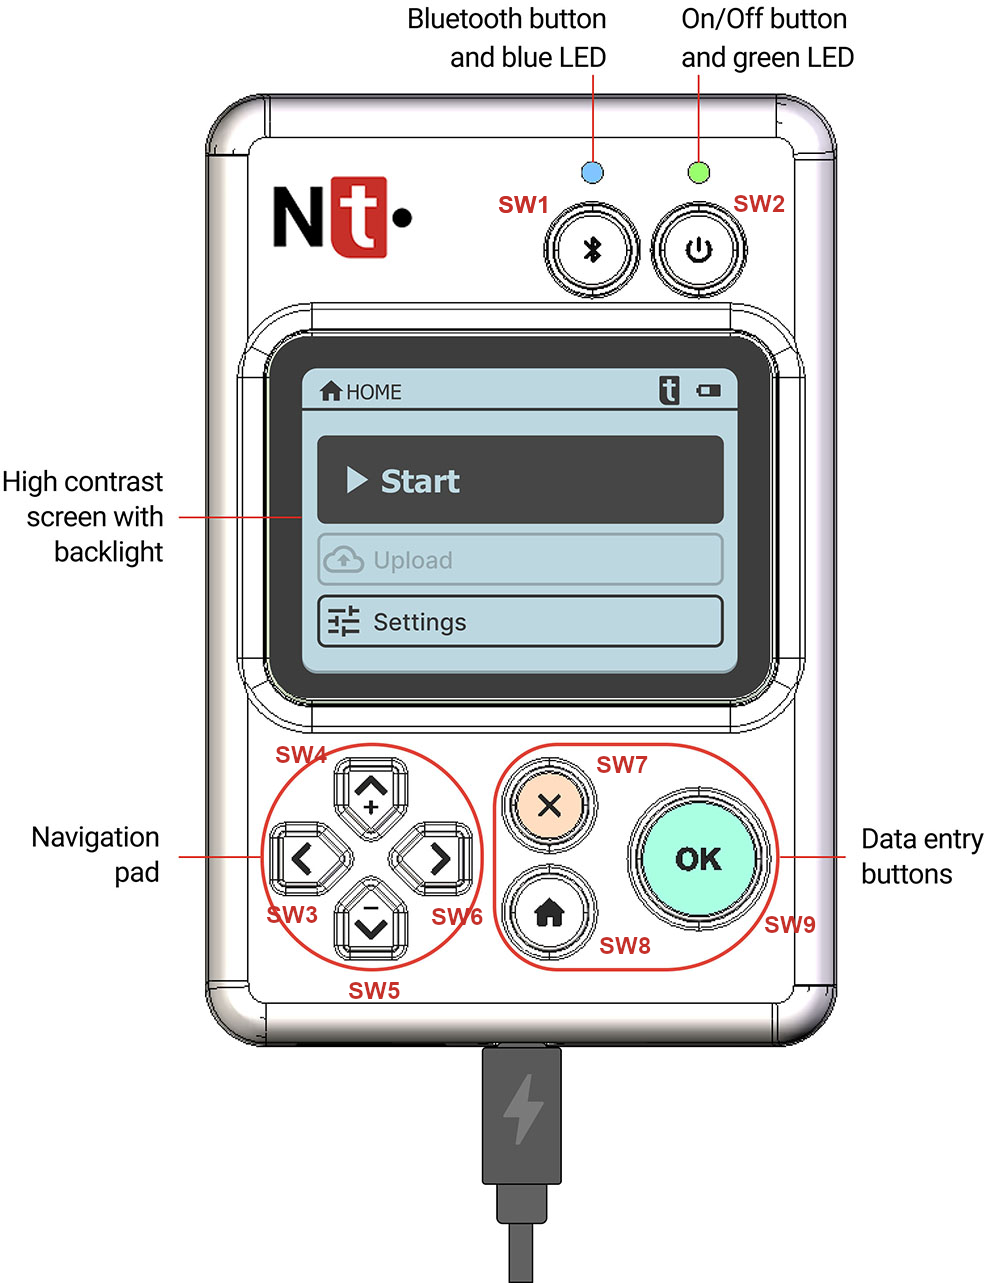
Button Legend:
SW1: Bluetooth On/Off
SW2: Device On/Off
SW3: Left arrow
SW4: Up arrow
SW5: Down arrow
SW6: Right arrow
SW7: Clear button (often Red button)
SW8: Home button
SW9: OK button
Note
Always handle the device gently. If placing it face-down, you might accidentally press buttons.
Simple and Reliable Solution for Georeferenced Data Collection
Use the Nt· device to capture location-based (georeferenced) data quickly and reliably in the field.
Charging the Device
Use a USB-C cable and a 5V power adapter (at least 1.5A output). A 2.1A adapter charges faster. When plugged in, the green LED lights up to indicate charging is in progress.
Key Operations
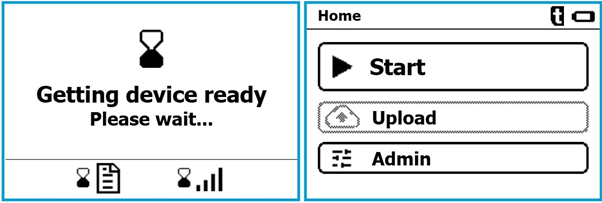
Turn On: Press and hold SW2 (On/Off) for ~3 seconds until the green LED blinks and “Getting Device Ready…” appears.
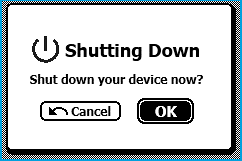
Turn Off:
Press and hold SW2 for ~3 seconds (from the main menu), OR
Navigate to , then confirm.
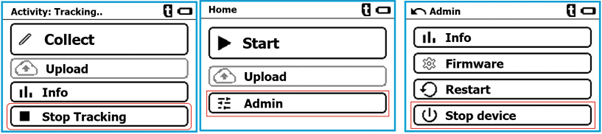
Restart:
Go to .
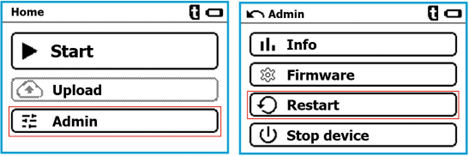
Screen On/Off: Press SW2 briefly to toggle the screen power (helps conserve battery).
Battery Life: Under normal usage, you can typically get about 1 month on a full charge.
Connectivity
USB (for charging and data transfer)
Bluetooth (for local data transfer and GTS Connect)
GSM (4G) (for SIM/eSIM connectivity)
SIM & eSIM
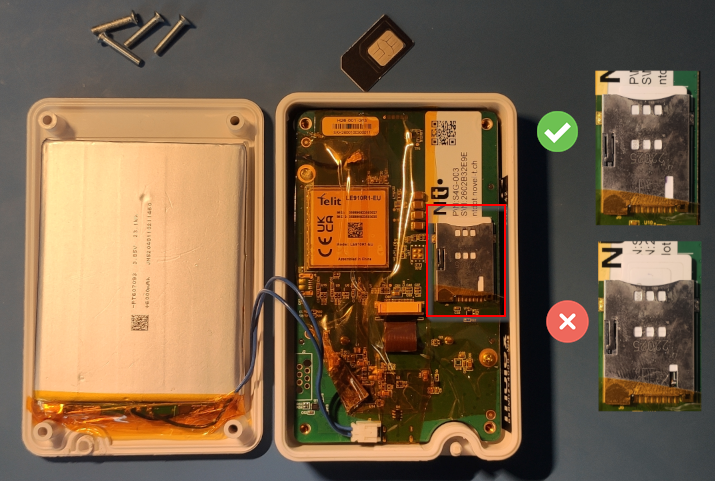
Physical SIM:
The device supports full-size SIM cards.
Power off the device before removing the back cover.
Slide the SIM into its slot until it clicks.
eSIM:
An embedded eSIM offers multi-carrier global connectivity.
Automatically connects to the strongest available network worldwide.
Contact info@novel-t.ch for eSIM activation or deactivation procedures.
Note
Roaming is currently not supported with the physical SIM. The eSIM supports multi-carrier and automatically connects to the strongest network. Contact Novel-T for more information.
2. Nt· with GTS
This section explains how to start using your Nt· device with the GTS platform, focusing on what is required on the GTS side (e.g., having a Field Activity, necessary user roles, ODK form definitions) and how to harness the companion GTS Connect Android app for mass deployments. GTS Connect is a powerful tool that allows you to quickly configure multiple Nt· devices, making it easier to manage large-scale field operations.
Activate (Set Up) Your GTS Campaign
The basic workflow:
Create/Configure a Field Activity
Define campaign parameters, staff assignments, and statuses.
Set Up Team Codes
Each field team may have its own code, which the Nt· device will prompt for when starting a tracking session.
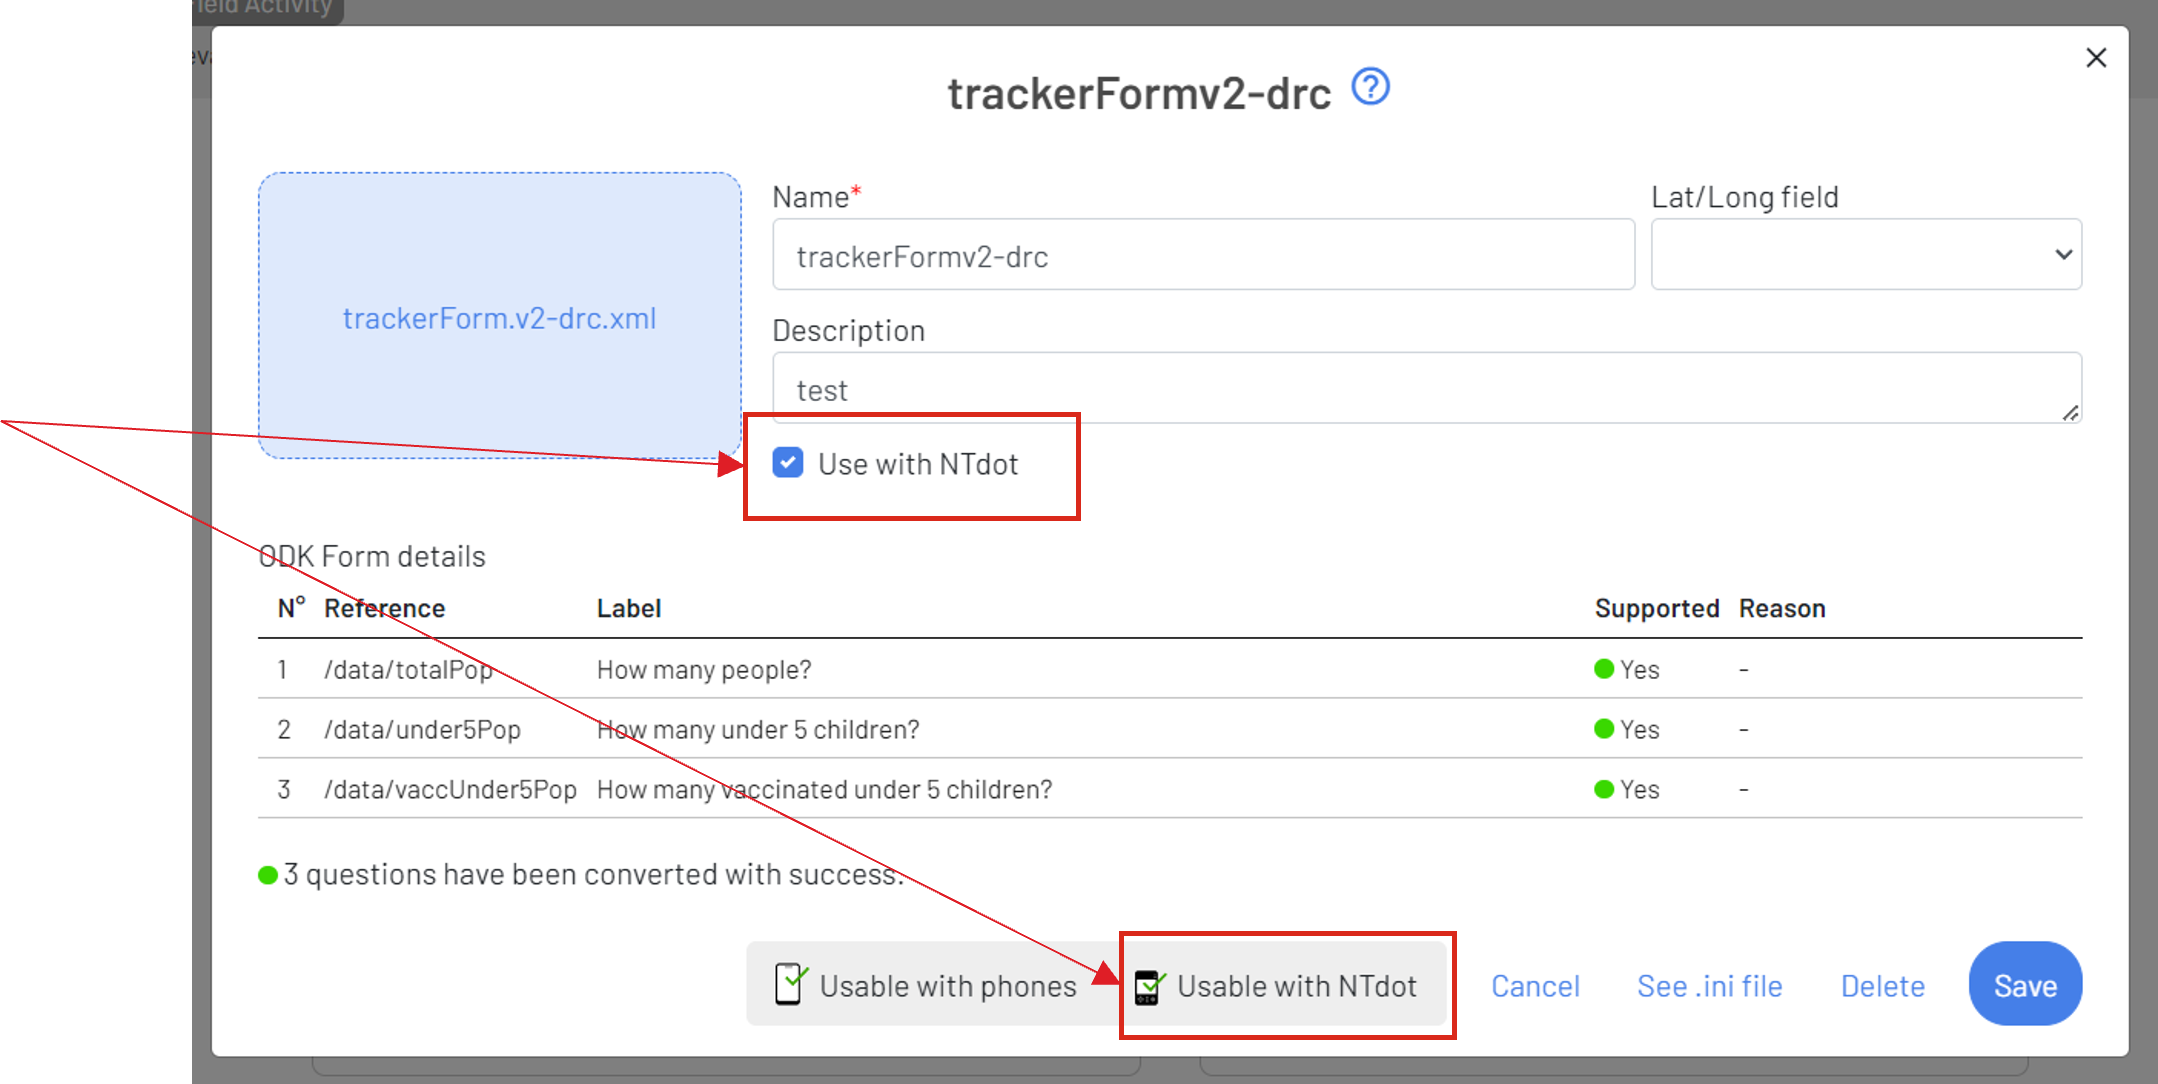
Prepare an ODK Form (if collecting data)
Use https://getodk.org/xlsform/ or an ODK-compatible builder.
Upload the form to GTS, ensuring field names/types match what the Nt· device supports (numeric and select/drop-down).
User Role Requirements
To deploy configurations, your GTS account must have Logistics Support permissions.
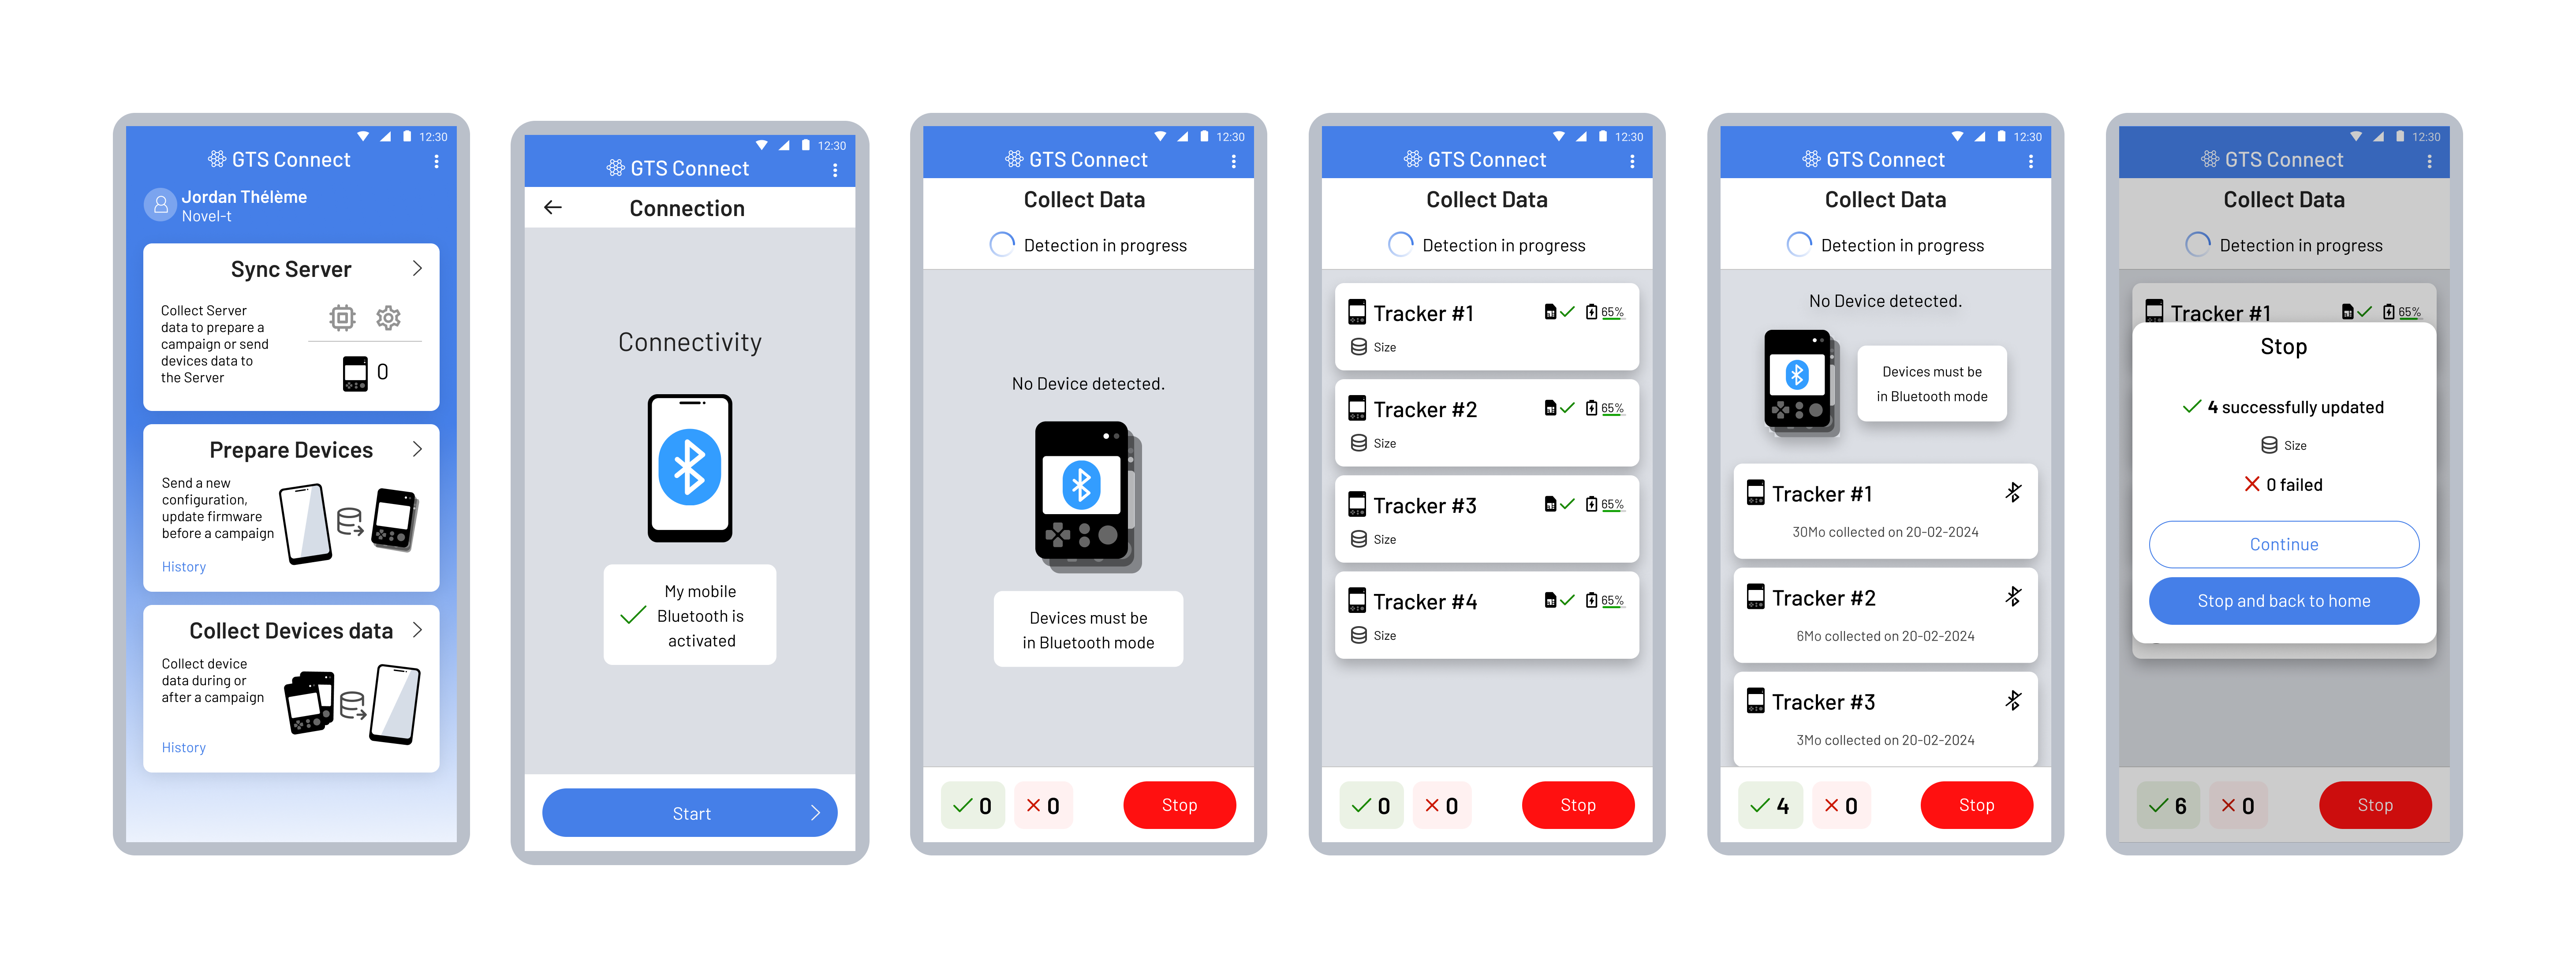
Configuring via GTS Connect
Install & Log In
(See Installing GTS Connect from the Store for instructions on installing GTS Connect from the store.)
Launch GTS Connect and log in with an account that has the Logistics Support role.
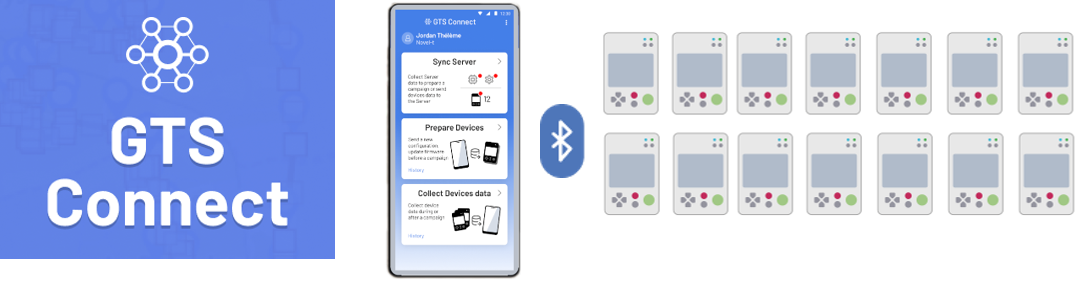
Synchronize
Tap Sync with Server to retrieve campaign data, ODK forms, and device configurations.
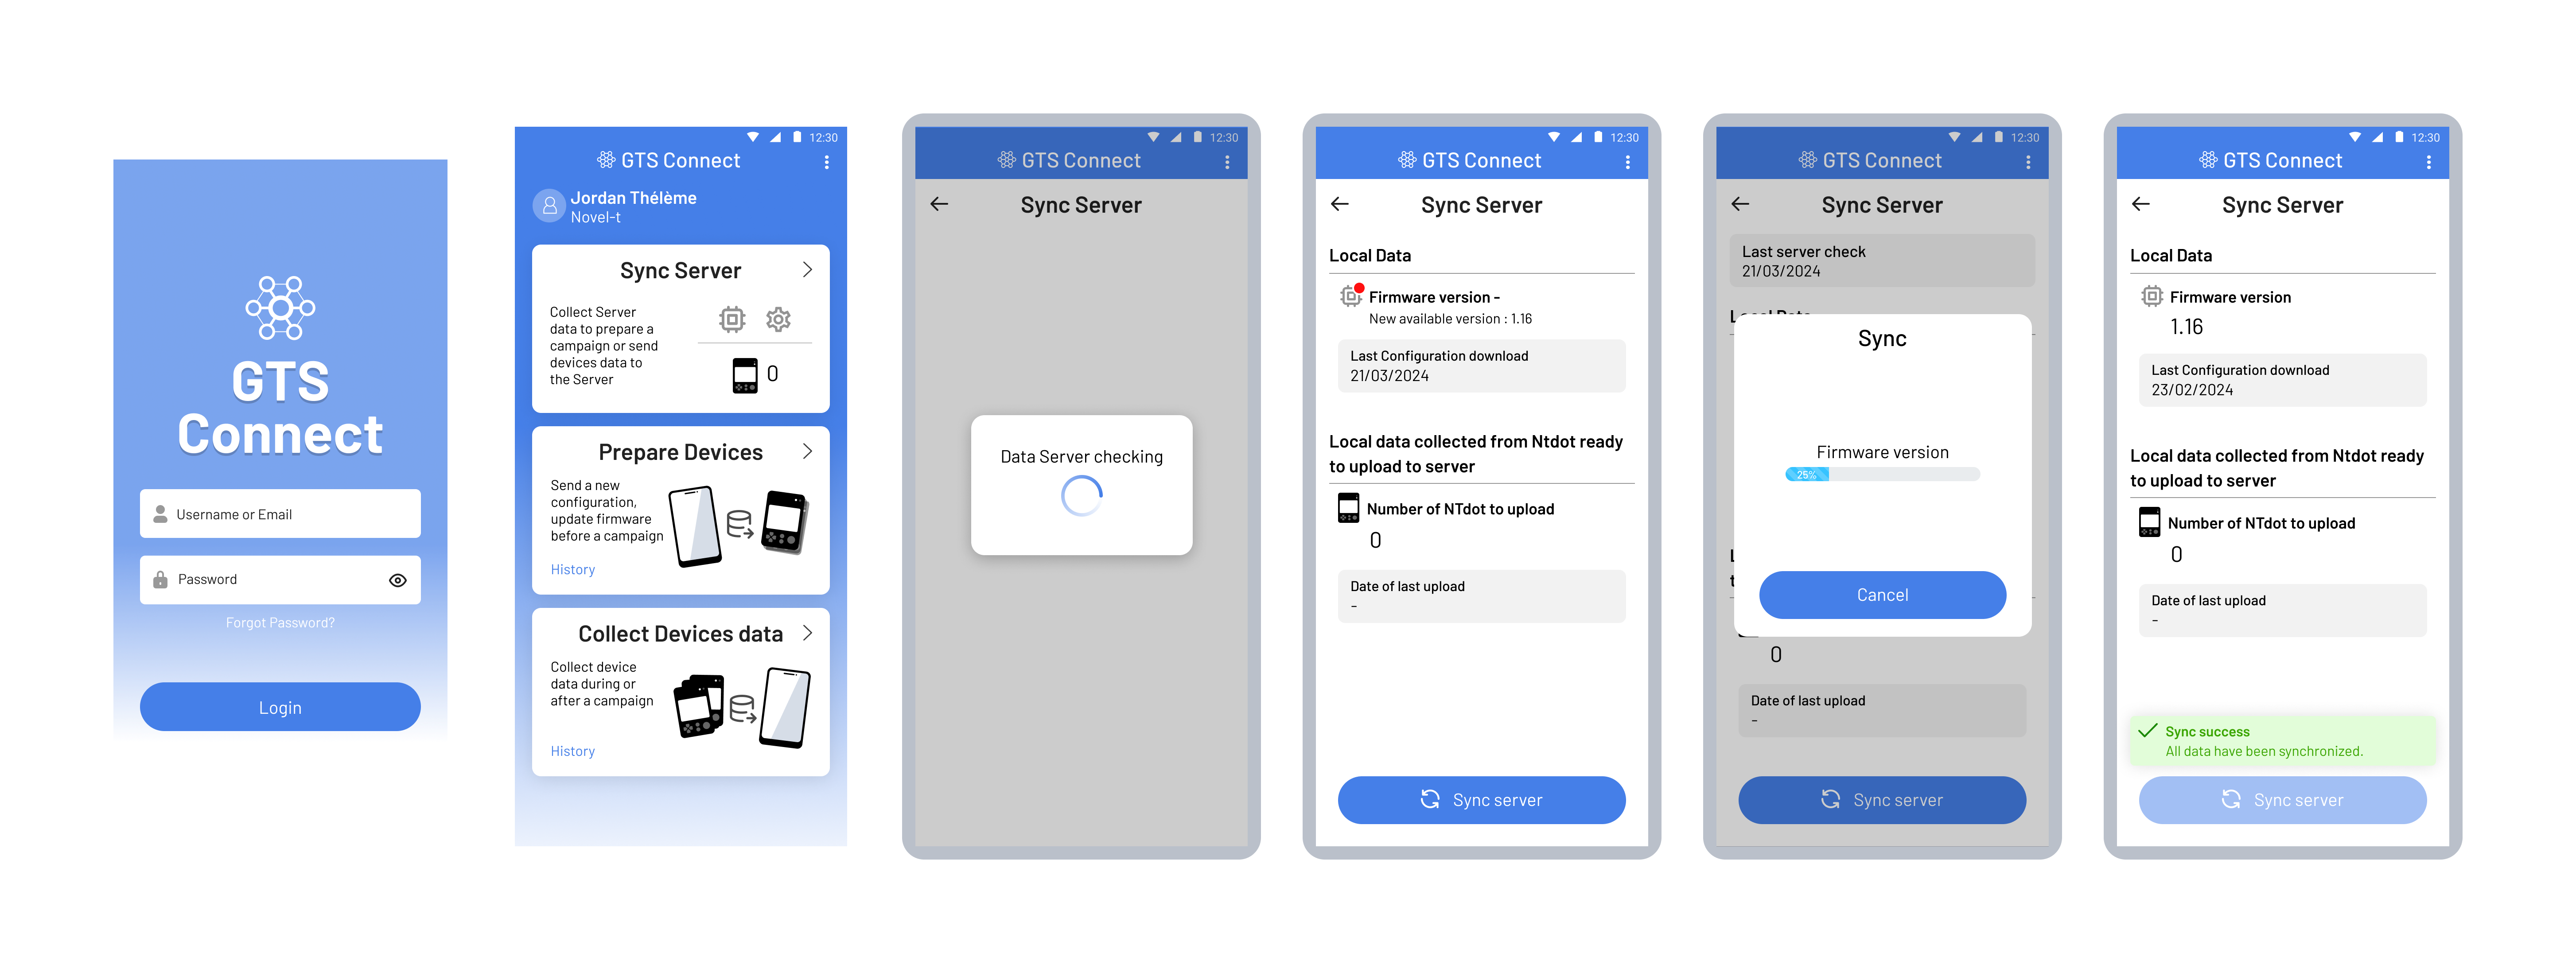
Prepare Device
Select Prepare Device (or “Deploy Configuration”).
Enable Bluetooth on your phone if prompted.
Enable Bluetooth on Nt·
On the device, press SW1 to turn on Bluetooth.
GTS Connect detects the device and applies configurations.
Once finished, the device’s Bluetooth turns off automatically.
Verify
GTS Connect shows a summary of updated devices.
Repeat if any device wasn’t successfully configured.
Starting a Field Activity
Turn On the Nt· Device:
Hold SW2 for ~3 seconds until you see “Getting Device Ready…”.
Start Tracking:
From the main menu, select Start.
Choose a Field Activity (if multiple are available) and confirm or enter the Team Code (you set this in GTS).
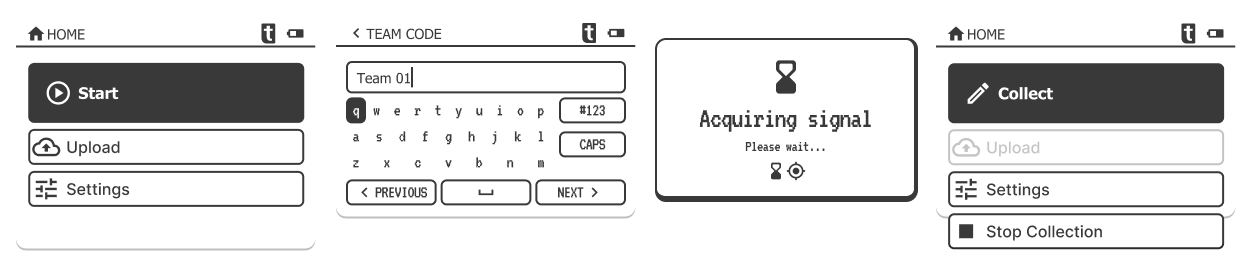
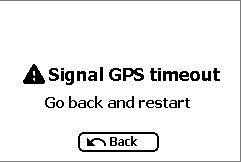
GPS Acquisition:
The device attempts to acquire GPS signals. If it cannot lock onto GPS within 1 hour, you may see an error message.
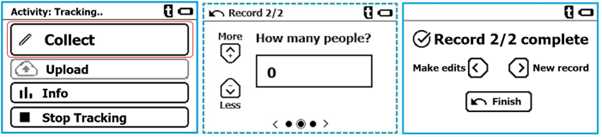
Optional ODK Data Collection:
Press Collect to fill out numeric or drop-down questions if your form is deployed.
Navigate questions using arrow keys. Press OK to move to the next question or confirm.
Uploading Data to GTS
Auto-Upload (Interval):
If configured in
field_activities.ini(upload_interval > 0), the device automatically sends data on a schedule (e.g., every hour).
Manual Upload:
On the main menu, select Upload (requires a valid SIM/eSIM data connection).
Wait for success or failure confirmation.
By Bluetooth:
If no SIM is installed and the eSIM is not activated, or if there is no coverage, you can retrieve data over Bluetooth via GTS Connect. (See Installing GTS Connect from the Store below for instructions on installing GTS Connect.)
Note
Your GTS Tracker field staff account must have the Logistics Support role, otherwise you will get an “Access Denied” message.
On the main screen, you’ll find an option to download data from your phone and upload it to the GTS server. Select Collect Devices Data and follow the steps. The app will prompt you to activate Bluetooth on your smartphone and begin scanning for available devices. Once scanning starts, turn on Bluetooth on the Nt· devices from which you want to collect data. The app automatically retrieves the data and disables Bluetooth on each device once complete.
You can stop scanning once all devices have been processed. At the end, you will be asked whether you want to send the data to the GTS server immediately or save it for later upload.
Note
You can also retrieve data via USB (see the standalone section below).
3. Nt· Standalone
You can use the Nt· device independently of GTS (“standalone mode”), managing configurations and data files manually through USB.
Manual Configuration
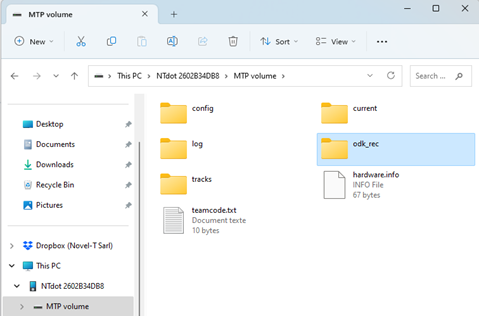
Connect via USB:
Use a USB-C cable to connect the Nt· device to your computer.
Your system detects the device as an MTP volume.
Edit/Replace Files:
Common files to edit: -
teamcode.txt(for changing or updating the team code) -field_activities.ini(to adjust tracking intervals, passcode, upload intervals) - ODK forms inconfig/odk_formsif you wish to collect data.
Back Up Before Changes:
Copy existing files to your computer before editing, to avoid misconfiguration.
Start Tracking (Standalone)
Turn On the Nt· Device
Press and hold SW2 for ~3 seconds.
Select “Start”
From the main menu, choose Start.
Enter your Team Code if required (as defined in
teamcode.txt).
Optional Data Collection
If a form is present in
config/odk_forms, select Collect to enter numeric or multiple-choice responses.For manual ODK form creation (if not using GTS to provide forms), see Manual ODK Form Creation under Advanced Operations.
Retrieving Data
Connect via USB:
Access the device’s MTP volume on your computer.
Tracks:
Located in the
tracksfolder (CSV files).
ODK Submissions:
Found in the
odk_recfolder (CSV files).
4. Troubleshooting & FAQ
Troubleshooting Common Issues
Device Screen Freezes:
Perform a Hard Reset (see Hard Reset in 5. Advanced Operations).
Windows Explorer Freezes When Accessing MTP:
Occasionally, Windows Explorer can freeze or become unresponsive when you connect the device via MTP—this often depends on the Windows driver or OS version. If this happens, simply unplug the USB cable, then replug it to refresh the connection. This workaround typically resolves the intermittent freeze.
Stuck on “Getting Device Ready…”:
Power off the device, then turn it on again.
If still stuck, share logs (see below) with Novel-T.
Cannot Upload to GTS:
Ensure a valid SIM/eSIM is inserted and has coverage.
Or try Bluetooth data collection with GTS Connect.
If the error persists, contact info@novel-t.ch.
FAQ
How long does the battery last?
Typically around 1 month under normal usage.
Can I use the device without a SIM?
Yes. You can still collect or track, but data upload requires Bluetooth (GTS Connect) or USB at a later stage.
Can I create custom forms?
Yes. Ensure you only use numeric or select-one fields. If uploading to GTS, match form IDs and field names with GTS.
Which power adapter should I use?
Any 5V adapter with 1.5A or 2.1A output.
Is roaming supported?
Roaming is currently not supported with the physical SIM. However, the embeded eSIM supports multi-carrier and automatically connects to the strongest network. Contact Novel-T for more information.
Can I set a 4-digit passcode to stop the device?
In
field_activities.ini, setfour_digits_to_stop=XXXX(e.g., 1234). Remove or clear the value to disable.My device is unresponsive.
Try a Hard Reset (see below).
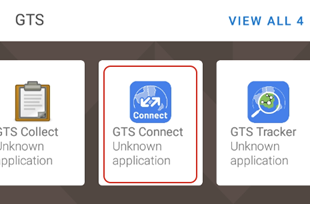
Installing GTS Connect from the Store
To install GTS Connect on your Android phone:
Open the GTS Store (the same source used for GTS Tracker).
Search for “GTS Connect”.
Tap Install and follow the prompts.
Launch the app and sign in with your Logistics Support credentials.
Note
If you do not see GTS Connect in the store, ensure your GTS account has permissions for Logistics Support. Otherwise, you may get an “Access Denied” error.
5. Advanced Operations
Some operations are less common or only needed for large updates/maintenance, including firmware updates, hard resets, and manual ODK form creation.
Firmware Updates
Nt· firmware is updated periodically to add new features, fix bugs, or improve performance. You can choose one of the following methods:
GTS Connect Android App
Ideal for deploying firmware to multiple devices at once.
The app downloads firmware from the GTS server and deploys it via Bluetooth.
Each device automatically turns off Bluetooth once updated.
Over the Internet (via SIM/eSIM)
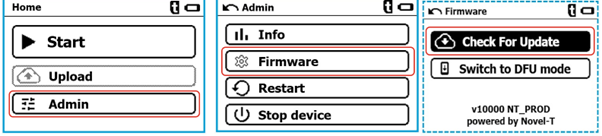
On the device, go to .
If an update is available, select Install.
Blue and green LEDs blink alternately during installation. The device reboots upon completion.
USB / Manual Upgrade
Connect via USB-C. Copy the firmware file (e.g.,
fwupgrade.ava) to the root of the device’s storage.On the device, go to and select Install.
The device restarts automatically after installation.
Caution
Always back up configuration files before manual upgrades.
Manual ODK Form Creation
If you are not using GTS to provide your ODK forms, you can create them manually in the Nt· configuration:
Create a .ini file inside the
config/odk_formsfolder on the Nt· device (after connecting via USB).In that file, define questions using the [question_x] structure. For example:
**title**\=Form title example
[question_1]type=integerlabel=Number of children?; The max length for labels: 60 charoptions=; Property is not used here but needs to be there.required=true; Means the field is mandatorymin_value=0max_value=100hint_text=Value must be between 0 and anything[question_2]type=select1label=Select reason for non complianceoptions=OPV Safety,Child Sick,Religious Belief,No Felt Need,Political Differences,No Caregiver Consent; Example of select one fieldSave the file, disconnect the device, and restart it. The new form should appear under Collect if the device is in Standalone mode.
Note
Currently, the Nt· device supports only numeric fields (type=integer) and single-select fields (type=select1) for ODK forms.
Hard Reset
If your Nt· device is completely unresponsive or frozen:
Press and hold SW2 (On/Off) and the Red button (often SW7) for 10 seconds.
Release both buttons. The LED above SW2 should blink green.
The screen will display “Getting Device Ready…” upon reboot.
Note
A hard reset does not erase configurations or data; it simply restarts the device forcefully.